2.K8s API访问方式
通常,Kubernetes API 支持通过标准 HTTP POST、PUT、DELETE 和 GET 在指定 PATH 路径上创建、更新、删除和检索操作,并使用 JSON 作为默认的数据交互格式。
比如现在我们要创建一个 Pod对象,那么我们的 YAML 文件的声明就需要怎么写:
再入一个Job的资源对象如下:
其中 Job 就是这个 API 对象的资源类型 Kind,而资源 Resource 通常为 Kind 的小写复数词,比如这里就是 jobs,batch 就是它的组(Group),v1 就是它的版本(Version),API Group、Version 和资源就唯一定义了一个 HTTP 路径,然后在 kube-apiserver 端对这个 URL 进行了监听,然后把对应的请求传递给了对应的控制器进行处理而已。

Resource 和 Kind 的区别是什么?需要注意的 Resource 指的是 HTTP Restful API 请求路径中的资源(理解 Restful API 的资源),而 Kind 对应的是系统中真正的实体,这两个是有本质区别的。
每个 Kind 都存在于一个 Group 和 Version 中 , 并通过 GroupVersionKind (GVK) 来标识,GVR 和 GVK 是相关联的,GVK 通过 GVR 标识的 HTTP 路径来提供服务,将 GVK 映射到 GVR 的过程就叫做 REST mapping。
API 请求处理过程
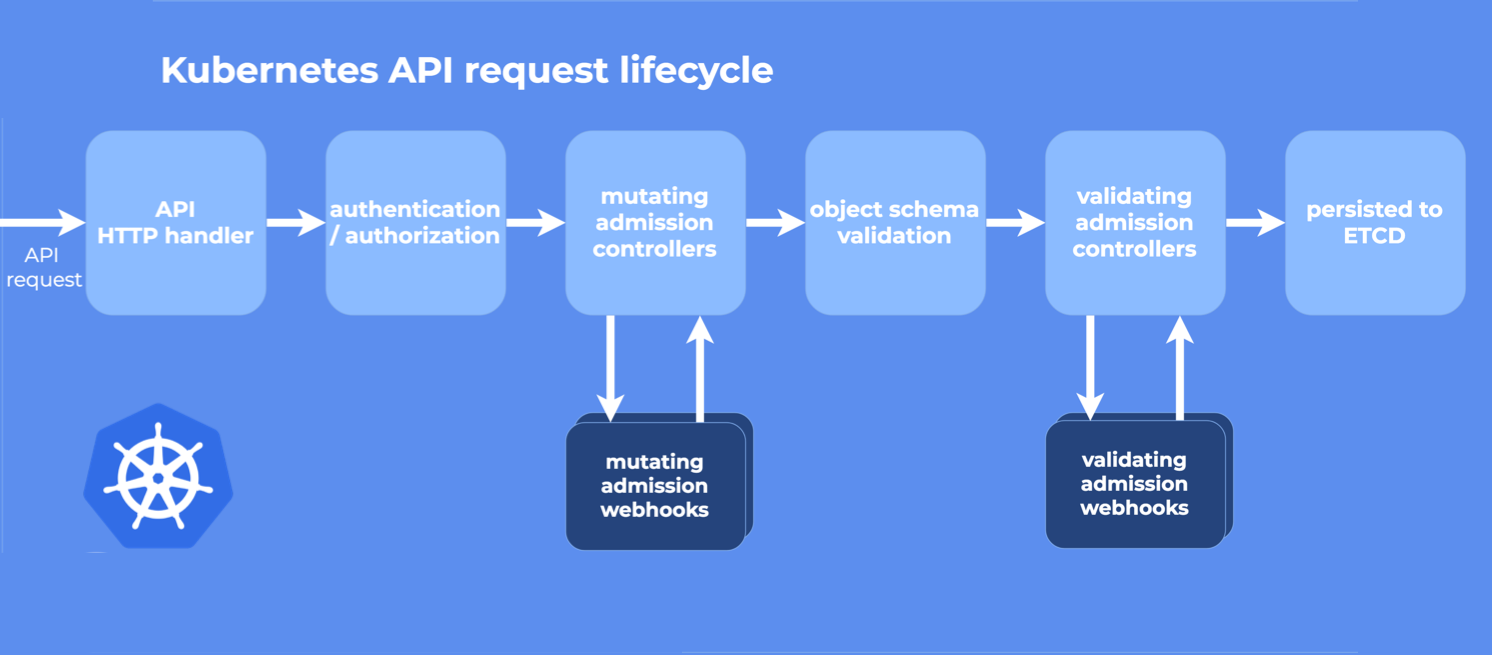
上图是 Kubernetes API 处理请求的整个流程:
- HTTP 请求先由
DefaultBuildHandlerChain()注册的一系列过滤器处理 , 这个函数位于k8s.io/apiserver/pkg/server/config.go 文件中,它对请求进行一系列过滤操作,经过验证的就返回相应 HTTP 返回码 - 接下来根据请求的路径,通过 handler 路由到各种程序中 k8s.io/apiserver/pkg/server/handler.go
- 每个 API Group 都注册了一个 handler , 详情参见k8s.io/apiserver/pkg/endpoints/groupversion.go和 k8s.io/apiserver/pkg/endpoints/installer.go 它接受 HTTP 请求和上下文,并从 etcd 中检索和传递请求的对象进行数据处理。
一 kubectl
比如我们来查看批处理这个操作,在我们当前这个版本中存在两个版本的操作:/apis/batch/v1 和 /apis/batch/v1beta1,分别暴露了可以查询和操作的不同实体集合,同样我们还是可以通过 kubectl 来查询对应对象下面的数据:
$ kubectl get --raw /apis/batch/v1 | python -m json.tool
{
    "kind": "APIResourceList",
    "apiVersion": "v1",
    "groupVersion": "batch/v1",
    "resources": [
        {
            "name": "cronjobs",
            "singularName": "",
            "namespaced": true,
            "kind": "CronJob",
            "verbs": [
                "create",
                "delete",
                "deletecollection",
                "get",
                "list",
                "patch",
                "update",
                "watch"
            ],
            "shortNames": [
                "cj"
            ],
            "categories": [
                "all"
            ],
            "storageVersionHash": "h/JlFAZkyyY="
        },
        {
            "name": "cronjobs/status",
            "singularName": "",
            "namespaced": true,
            "kind": "CronJob",
            "verbs": [
                "get",
                "patch",
                "update"
            ]
        },
        {
            "name": "jobs",
            "singularName": "",
            "namespaced": true,
            "kind": "Job",
            "verbs": [
                "create",
                "delete",
                "deletecollection",
                "get",
                "list",
                "patch",
                "update",
                "watch"
            ],
            "categories": [
                "all"
            ],
            "storageVersionHash": "mudhfqk/qZY="
        },
        {
            "name": "jobs/status",
            "singularName": "",
            "namespaced": true,
            "kind": "Job",
            "verbs": [
                "get",
                "patch",
                "update"
            ]
        }
    ]
}
二 程序访问
2.1 Go Client
要获得这个库,运行以下命令: go get k8s.io/client-go@kubernetes- < kubernetes-version-number > See https://github.com/kubernetes/client-go/releases 查看支持哪些版本。
package main

import (
  "context"
  "fmt"
  "k8s.io/apimachinery/pkg/apis/meta/v1"
  "k8s.io/client-go/kubernetes"
  "k8s.io/client-go/tools/clientcmd"
)

func main() {
  // uses the current context in kubeconfig
  // path-to-kubeconfig -- for example, /root/.kube/config
  config, _ := clientcmd.BuildConfigFromFlags("", "<path-to-kubeconfig>")
  // creates the clientset
  clientset, _ := kubernetes.NewForConfig(config)
  // access the API to list pods
  pods, _ := clientset.CoreV1().Pods("").List(context.TODO(), v1.ListOptions{})
  fmt.Printf("There are %d pods in the cluster\n", len(pods.Items))
}
2.2 Python Client
要使用 Python 客户端,运行以下命令: pip install kubernetes 查看 Python 客户端库页面获取更多安装选项。
Python 客户端可以使用与 kubectl CLI 相同的 kubeconfig 文件来定位和验证 API 服务器。看这个例子:
from kubernetes import client, config

config.load_kube_config()

v1=client.CoreV1Api()
print("Listing pods with their IPs:")
ret = v1.list_pod_for_all_namespaces(watch=False)
for i in ret.items:
    print("%s\t%s\t%s" % (i.status.pod_ip, i.metadata.namespace, i.metadata.name))
三 postman
3.1 创建admin sa用户
- 查看sa
cat > CreateServiceAccount.yaml <<EOF
apiVersion: v1
kind: ServiceAccount
metadata:
  name: admin-user
  namespace: kube-system
EOF
kubectl apply -f CreateServiceAccount.yaml
- 查看sa
3.2 用户授权
编写RoleBinding.yaml文件,给于cluster-admin角色
cat >RoleBinding.yaml <<EOF
apiVersion: rbac.authorization.k8s.io/v1beta1
kind: ClusterRoleBinding
metadata:
  name: admin-user
roleRef:
  apiGroup: rbac.authorization.k8s.io
  kind: ClusterRole
  name: cluster-admin
subjects:
- kind: ServiceAccount
  name: admin-user
  namespace: kube-system

EOF

kubectl apply -f  RoleBinding.yaml
3.3 查看
$ kubectl get secret -n kube-system | grep admin
admin-user-token-cz57l                           kubernetes.io/service-account-token   3      60m

$ kubectl describe secrets `kubectl get secret -n kube-system | grep admin | awk '{print $1}'` -n kube-system
3.4 使用token进行测试api

在postaman中关闭SSL认证(setting)
3.5 API查阅
https://kubernetes.io/docs/reference/kubernetes-api/workload-resources/deployment-v1/
https://kubernetes.io/docs/reference/generated/kubernetes-api/v1.22/

四 curl访问
4.1 kubectl proxy
下面的命令以它作为反向代理的模式运行 kubectl。它处理定位 API 服务器和身份验证。
$ curl http://localhost:8080/api/
{
  "versions": [
    "v1"
  ],
  "serverAddressByClientCIDRs": [
    {
      "clientCIDR": "0.0.0.0/0",
      "serverAddress": "10.0.1.149:443"
    }
  ]
}

$ curl http://localhost:8080/apis/batch/v1
{
  "kind": "APIResourceList",
  "apiVersion": "v1",
  "groupVersion": "batch/v1",
  "resources": [
    {
      "name": "jobs",
      "singularName": "",
      "namespaced": true,
      "kind": "Job",
      "verbs": [
        "create",
        "delete",
        "deletecollection",
        "get",
        "list",
        "patch",
        "update",
        "watch"
      ],
      "categories": [
        "all"
      ],
      "storageVersionHash": "mudhfqk/qZY="
    },
    {
      "name": "jobs/status",
      "singularName": "",
      "namespaced": true,
      "kind": "Job",
      "verbs": [
        "get",
        "patch",
        "update"
      ]
    }
  ]
}
$ curl http://127.0.0.1:8001/apis/batch/v1beta1
```
4.2 没有 kubectl 代理
通过将认证令牌直接传递给 API 服务器,可以避免使用 kubectl 代理,如下所示:
# Check all possible clusters, as your .KUBECONFIG may have multiple contexts:
kubectl config view -o jsonpath='{"Cluster name\tServer\n"}{range .clusters[*]}{.name}{"\t"}{.cluster.server}{"\n"}{end}'

# Select name of cluster you want to interact with from above output:
export CLUSTER_NAME="some_server_name"

# Point to the API server referring the cluster name
APISERVER=$(kubectl config view -o jsonpath="{.clusters[?(@.name==\"$CLUSTER_NAME\")].cluster.server}")

# Gets the token value
TOKEN=$(kubectl get secrets -o jsonpath="{.items[?(@.metadata.annotations['kubernetes\.io/service-account\.name']=='default')].data.token}"|base64 --decode)

# Explore the API with TOKEN
curl -X GET $APISERVER/api --header "Authorization: Bearer $TOKEN" --insecure


{
  "kind": "APIVersions",
  "versions": [
    "v1"
  ],
  "serverAddressByClientCIDRs": [
    {
      "clientCIDR": "0.0.0.0/0",
      "serverAddress": "10.0.1.149:443"
    }
  ]
}
jsonpath
APISERVER=$(kubectl config view --minify -o jsonpath='{.clusters[0].cluster.server}')
TOKEN=$(kubectl get secret $(kubectl get serviceaccount default -o jsonpath='{.secrets[0].name}') -o jsonpath='{.data.token}' | base64 --decode )
curl $APISERVER/api --header "Authorization: Bearer $TOKEN" --insecure
{
  "kind": "APIVersions",
  "versions": [
    "v1"
  ],
  "serverAddressByClientCIDRs": [
    {
      "clientCIDR": "0.0.0.0/0",
      "serverAddress": "10.0.1.149:443"
    }
  ]
}